Make a Christmas picture wheel that reveals one scene at a time
A turning paper wheel can show three small Christmas scenes through one window. The wheel moves by hand; it is not a flipbook or an animation. The important construction choice is keeping the window, pivot and pictures aligned so that a neighbouring scene does not intrude.

Use two circles of card, a pencil, ruler, protractor, scissors and a split-pin paper fastener handled by an adult. The front circle is a cover with one window. The circle behind holds the pictures. Keep the fastener and cut scraps away from anyone for whom small parts are unsuitable.
Mark the same centre on both circles
Draw the two circles at the same size and mark their centres clearly. Divide the picture circle into three equal sectors: their centre lines are 120 degrees apart. Sketch one small scene around each centre line, leaving space between scenes.
A practical design starts with a narrow window rather than a large opening. Our nominal example uses a 40-degree window and keeps each picture within 15 degrees on either side of its sector’s centre. Check this layout by turning the undecorated wheel before drawing the final scenes. Keep the inner area around the pivot clear.
Cut the window in the cover
On the front circle, draw an opening that exposes the picture area but leaves material around the centre and outer edge. An adult should manage any cut that requires piercing the card. Do not remove the whole sector: the cover needs to stay connected.
Before fastening, lay the cover over the picture circle and align their centres. Turn the picture circle while holding the cover still. Check each scene separately. If part of the next scene appears, narrow the window or move the drawings farther from the sector boundaries.
| Check | What to adjust |
|---|---|
| Centres do not match | Redraw or reposition the pivot marks |
| Picture disappears behind the cover | Move it into the window’s visible band |
| Next scene intrudes | Narrow the opening or reduce the picture width |
| Card tears near the centre | Make a new cover with more material there |
Fit the pivot without locking the wheel
Have an adult make a small hole through each marked centre. Put the split pin through both holes from the front and spread its two legs against the back. Leave enough clearance for the picture circle to turn; pressing the fastener tightly against the card can lock it. If it catches, inspect the alignment and fastening pressure. Do not enlarge a torn hole until the wheel no longer has a reliable centre.
Hold the cover and turn the back circle through each scene. It should reveal the intended picture without exposing a second one. Try this before adding final colouring, labels or decorative edges.
Give the wheel a simple story
Your three original scenes might be a bare tree, the same tree with decorations and a wrapped gift beside it. Keep the drawing small enough for the actual window. Leave space between the scenes so you can select each one clearly.
The finished object is a manually selected picture wheel. Check it in the hands of the person who will use it, and stop using it if the fastener loosens or the card tears. Success is three readable scenes and a wheel that turns, not merely two circles joined together.
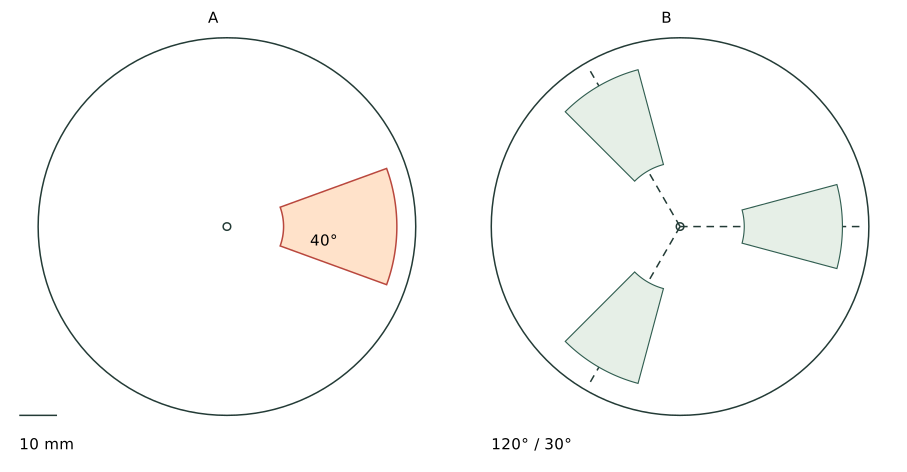
Print at 100% and check the calibration ruler. This dimensional guide has not been physically trialled.