Make a Christmas mosaic with broad paper pieces
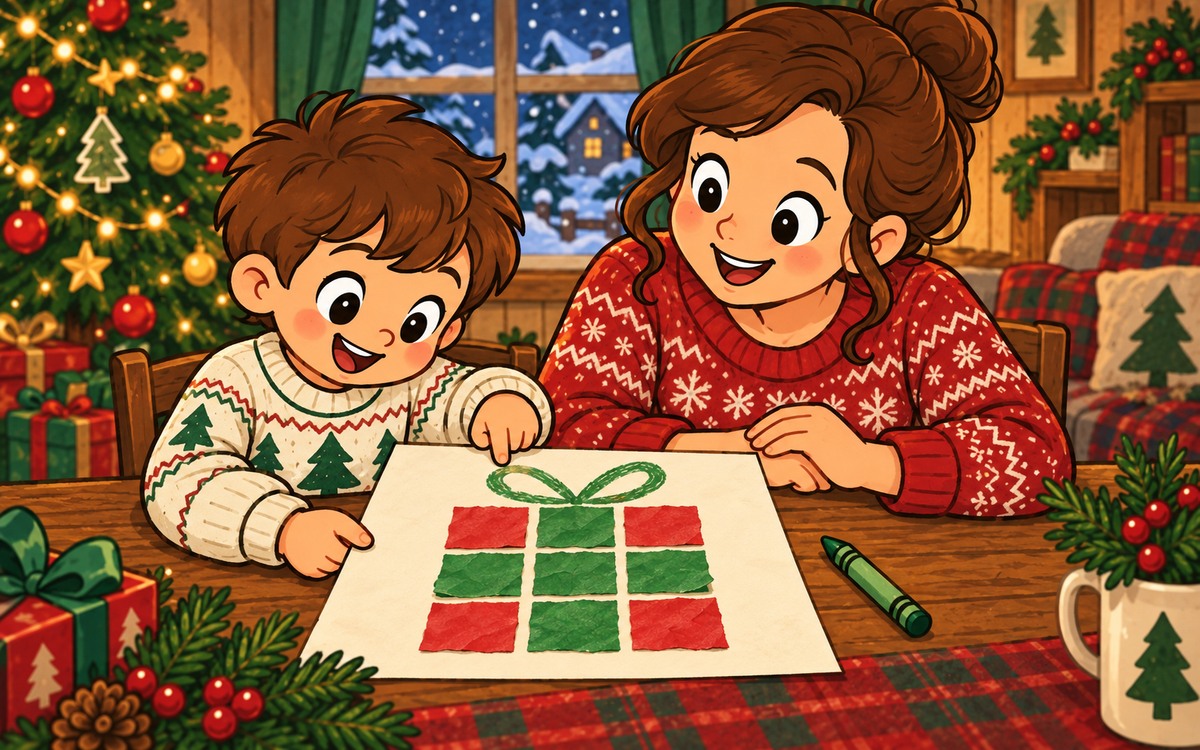
Arrange nine broad paper patches into a gift picture, leaving small gaps between them. Try the colors before gluing, or use the shorter four-piece version.
Choose a small picture and two colors
A Christmas gift shape works well for a first paper mosaic: a square with a ribbon crossing its middle. Broad paper patches make the pieces easy to move while you try the arrangement. You can leave the pale backing visible in the gaps.
Use a firm backing sheet, two colors of paper, a pencil, scissors, a glue stick and a crayon for the final bow. Choose pieces your child can pick up comfortably. This activity uses large patches on the page, rather than a shower of tiny confetti.
Prepare nine pieces and room for them
Cut four broad squares from one color and five from the other, with adult help when needed. Red corners and a green ribbon are one possible choice. Use the first square as a rough size guide; the edges need not match exactly.
Lay three pieces next to one another on the backing, with small gaps. Check that three rows of that width will fit inside the sheet. You can lightly mark a square around the planned area, leaving extra space above for the bow.
If the pieces do not fit, use a larger backing or reduce the paper squares before gluing. Keep them broad enough to handle easily. The dry layout is the time to make that change.
Make a ribbon with the second color
Arrange the nine patches in three rows of three. Put the first color in the four corners. Use the second color for the center patch and the middle patch along each of the four sides. Together, those five patches suggest a crossing ribbon.
Leave a narrow gap between neighboring patches so each piece remains visible. Shift a piece inward if it crosses the backing edge. Check the colors together before picking up the glue.
Your child can change the arrangement. If they prefer mixed colors to the ribbon pattern, keep their choice and draw a bow above it afterwards.
Attach one patch at a time
Lift one piece, put glue on its back and return it to the same place. Work along one row before starting the next. Press gently; avoid dragging the pieces across the wet glue.
Let the glue set with the page flat. Then draw two broad loops above the mosaic to suggest a bow. Lift the picture gently and check whether any corner needs pressing down.
For a shorter version, use four broad patches in two rows of two. After gluing, draw a crossing ribbon and a bow on the finished square. Either version can end with one gift picture.
OUR PAPER GIFT MOSAIC
Full version: four corner-color patches and five ribbon-color patches
Three rows of three tried without glue: ______
Small gaps and backing margins kept: ______
Color choice checked together: ______
One patch glued at a time: ______
Glue set flat before drawing the bow: ______
Short version: four patches in two rows, then a drawn ribbon and bow